Nam libero tempore, cum soluta nobis est eligendi optio cumque
Nompedit quo minus id quod maxime

Thank You for purchasing my theme. If You have any questions that are beyond the scope of this documentation, please feel free to submit ticket to http://big-skins.com/support Thanks so much!
Shopify provides You with a variety of tools to help You set up and run Your business. Depending on the plan that You choose, You can find everything You need to showcase Your products online, to process payments, and to make Your store work for You. Shopify offers:
Shopify is web based ecommerce software. This means there’s no installation required and it works with all operating systems (including Windows and MacOS)! Shopify hosts site itself so You don’t have to worry about installing, upgrading or maintaining any software or web servers. Go here to install shopify

1st be sure that You've installed shopify
2nd You need have latest seiko package from themeforest
1.Login to Your shopify store. Go to Online Stores -> Themes.

2.Click Upload Theme

3.Browse local seiko theme zip package and upload

4.Click Publish theme.

5.Congratulations! You have installed theme successfully! You can check it on frontend of Your site.
1.Login to Your shopify store. Go to Online Stores -> Pages.

Next

2.Click Add page

3.Choose template page.contact, write Page Title Contact Us and click save

Click Save
Now that you have created your Contact page, you can add your Contact page to your main navigation menu.
1.Login to Your shopify store. Go to Online Stores -> Pages.

Next

2.Click Add page

3.Choose template page.wishlist, write Page Title My Wishlist and click save

Click Save
Now that you have created your Wishlist page, you can add your Wishlist page to your main navigation menu.
Shopify has no product stars, reviews tab by default:


That is why You have to install special FREE reviews app Product Reviews
In this section of Your Shopify admin, You can choose which currency Your store uses (for example: USD, EUR, CAD, AUD, JPY):
1.From Your Shopify admin, click Settings (or press G S):

2.In the Standards and formats section, use the drop-down menu under Currency to select a new monetary unit:

3.Click Change formatting and You will see next

4.Change first to inputs to:
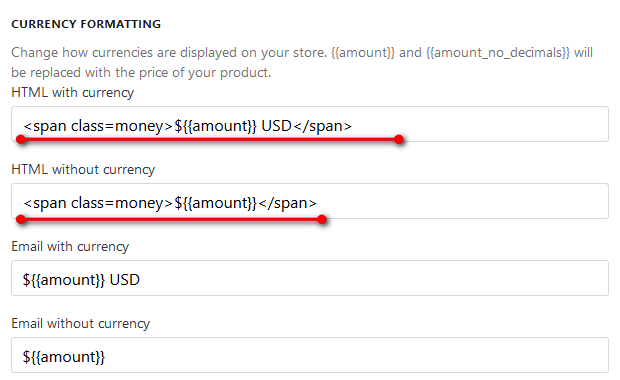
                    //copy lines from here
                    ${{amount}} USD
                    ${{amount}}
You can make customer accounts required or optional, or disable them altogether. Keep in mind that requiring customers to create accounts might decrease sales conversions.
To edit Your customer account settings:

In these files You will see smth like this:
Index: layout/theme.liquid
===================================================================
--- layout/theme.liquid	(revision 109)
+++ layout/theme.liquid	(revision 110)
@@ -17,12 +17,12 @@

         {% include header %}

-                    {% unless template == 'cart' and  cart.item_count == 0 %}{% include 'breadcrumb' %}{% endunless %}
+                    {% unless template == 'cart' and  cart.item_count == 0 %}{% unless template == '404' %}{% include 'breadcrumb' %}{% endunless %}{% endunless %}
             {{content_for_layout}}

-                {% unless template == 'cart' and  cart.item_count == 0 %}
+                {% unless template == 'cart' and  cart.item_count == 0 %}{% unless template == '404' %}
                 {% include footer %}
-                {% endunless %}
+                {% endunless %}{% endunless %}
This means that was changed file layout/theme.liquid
You need go to Shopify admin -> Online Stores -> Themes and click Edit HTML/CSS

Click on file layout/theme.liquid in left sidebar
Goto diff file again:
- {% unless template == 'cart' and  cart.item_count == 0 %}{% include 'breadcrumb' %}{% endunless %}
+ {% unless template == 'cart' and  cart.item_count == 0 %}{% unless template == '404' %}{% include 'breadcrumb' %}{% endunless %}{% endunless %}
..means that You need replace first string with second.
- remove string
+ add string
There 2 ways customize theme:
Goto Shopify admin -> Online Stores -> Themes -> Customize Theme


You will see a lot of theme settings You can change.

You need go to Shopify admin -> Online Stores -> Themes and click Edit HTML/CSS


Difficult customization of theme requires style changes in css. Theme has main assets/style.css file. You can directly add own changes in that file, but it is bad for updates. It is easy in future simply replace old style.css with new style.css.
That is why we propose create own custom.css file and write changes in it.
Steps how create custom.css:
Goto Shopify admin -> Online Stores -> Themes -> Choose your theme -> Edit html/css

Click Assets -> Add a new asset -> Create a blank file -> Write 'Custom' -> Choose '.css' -> Click 'Add Asset'

Click custom.css -> Add a new css changes -> Save

Last step is adding custom.css in head.liquid
Click Snippets -> Click head.liquid -> write {{ 'custom.css' | asset_url | stylesheet_tag }} after {{ 'font-icomoon.css' | asset_url | stylesheet_tag }} -> Save

Seiko theme has 8 pre-defined home pages:
Pre-defined home page choosed as default
Pre-defined home page
To choose it Goto Shopify admin -> Online Stores -> Themes -> Customize Theme -> General - Global Settings ->Home Page choose in selectbox Home Page 2
Pre-defined home page
To choose it Goto Shopify admin -> Online Stores -> Themes -> Customize Theme -> General - Global Settings ->Home Page choose in selectbox Home Page 3
Pre-defined home page
To choose it Goto Shopify admin -> Online Stores -> Themes -> Customize Theme -> General - Global Settings ->Home Page choose in selectbox Home Page 4
Pre-defined home page
To choose it Goto Shopify admin -> Online Stores -> Themes -> Customize Theme -> General - Global Settings ->Home Page choose in selectbox Home Page 5
Pre-defined home page
To choose it Goto Shopify admin -> Online Stores -> Themes -> Customize Theme -> General - Global Settings ->Home Page choose in selectbox Home Page 6
Pre-defined home page
To choose it Goto Shopify admin -> Online Stores -> Themes -> Customize Theme -> General - Global Settings ->Home Page choose in selectbox Home Page 7
Pre-defined home page
To choose it Goto Shopify admin -> Online Stores -> Themes -> Customize Theme -> General - Global Settings ->Home Page choose in selectbox Home Page 8
!Important! Our demo has in one store all home pages at the same time. Downloaded theme can has one home page. There no ability assign other home pages as simple pages like in demo. But we can discuss this bigstepscenter@gmail.com
Every home page pre-defined in seiko divided by sections вesides Header and Footer.
Schematic representation:

Every home page has 6 sections.
You can choose in admin any block for current section.


Example creation Classic home page

There 2 ways set Classic Home page.
You can simply choose pre-defined Classic home page(Shopify admin/Online Stores/Themes/Customize Theme/General/Pre-defined Home Page/Classic) or set it manually as described in next steps:
Goto Shopify admin -> Online Stores -> Themes -> Customize Theme


Choose in theme settings Home Page - Default:
Choose next options:
In turn, You have to configure each selected section in the admin area.
For example we choosed for "Section 3 - choose from selectbox Products Carousel 3"
Goto Shopify admin -> Online Stores -> Themes -> Customize Theme
You will find there this Section block


For example we choosed for "Section 4 - choose from selectbox Static Banner"
Goto Shopify admin -> Online Stores -> Themes -> Customize Theme
You will find there this Section block - Section Banner

There no need have css/html skill to write banners grid code. We've created easy tool for You - Banners generator. Generate code there and paste here.
Example creation Banners home page

There 2 ways set Banners home page.
You can simply choose pre-defined Banners home page(Shopify admin/Online Stores/Themes/Customize Theme/General/Pre-defined Home Page/Banners) or set it manually as described in next steps:
Goto Shopify admin -> Online Stores -> Themes -> Customize Theme


Choose in theme settings Home Page - Default:
Choose next options:
In turn, You have to configure each selected section in the admin area.
For example we choosed for "Section 1 - choose from selectbox Section Banners Grid 1"
Goto Shopify admin -> Online Stores -> Themes -> Customize Theme
You will find there this Section block - Section Banners Grid 1

There no need have css/html skill to write banners grid code. We've created easy tool for You - Banners generator. Generate code there and paste here.
Example creation Default Wide home page
There 2 ways set Classic Default page.
You can simply choose pre-defined Default home page(Shopify admin/Online Stores/Themes/Customize Theme/General/Pre-defined Home Page/Default) or set it manually as described in next steps:
Goto Shopify admin -> Online Stores -> Themes -> Customize Theme


Choose in theme settings Home Page - Default:
Choose next options:
This material is taken from official sources https://help.shopify.com/manual/sell-online/online-store/menus-and-links#create-a-drop-down-menu
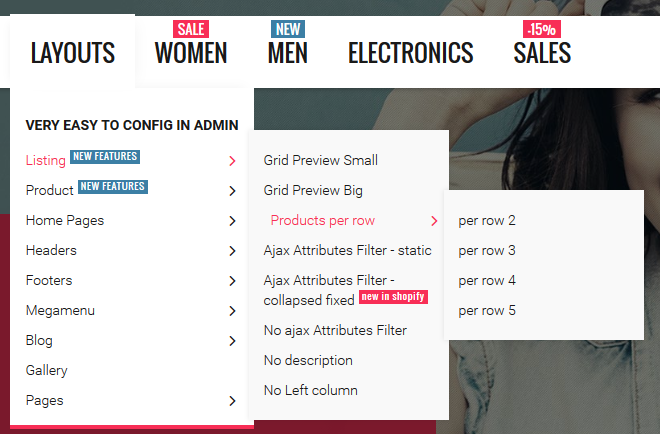
This type of menu in Seiko by default.
A drop-down menu displays a list of links when Your customer hovers their mouse over it.
From Your Shopify admin, click Online Store, and then click Navigation.
The navigation page of most new stores has both a Main Menu menu and a Footer menu. You can make drop-down menus on Your storefront from any link in the Main Menu.

Click Add menu.
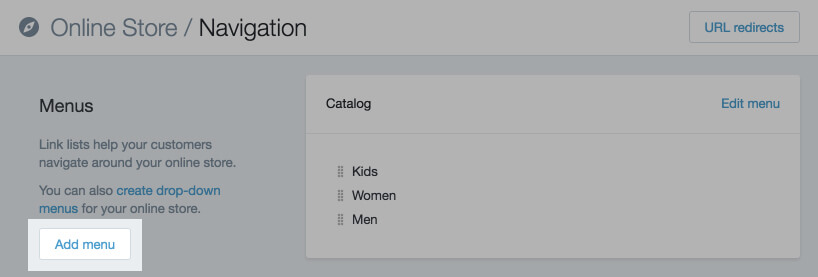
Type in the name for Your navigation. The handle will be automatically generated for You (do not edit it):

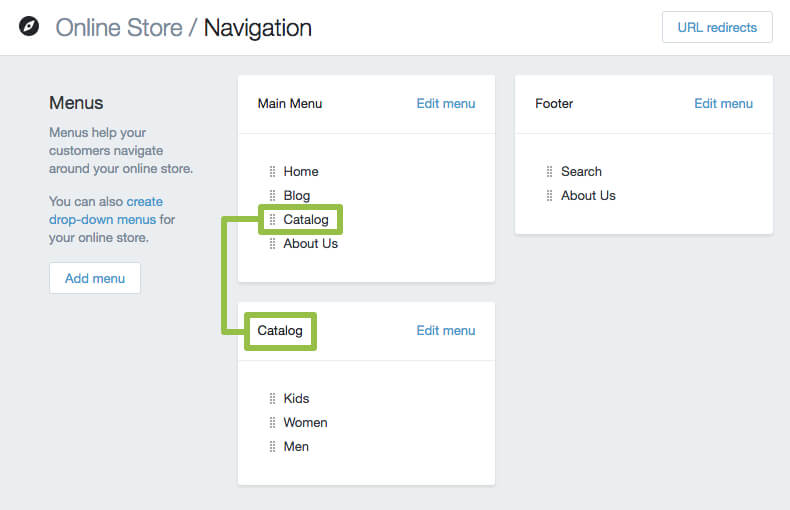
For this walkthrough to work, the name You enter MUST be the same as the name of the link in Your Main Menu that You wish to drop-down from. Because we want to drop-down from Catalog, we will name our menu "Catalog".
Click Add menu item one time for each link You want to include in Your drop-down menu.

For each link You've clicked to add, type in a Name, then click Link drop-down box and choose Your destinations for these links (e.g. You can link to specific collections, all products, or pages etc.)

Click Save
To check Your work, click back into the Navigation page of Your admin. You should have a new menu with the same name as one of the Main Menu links, like this:
You can check Your work in Your storefront
In our demo You can see labels in topnavigation
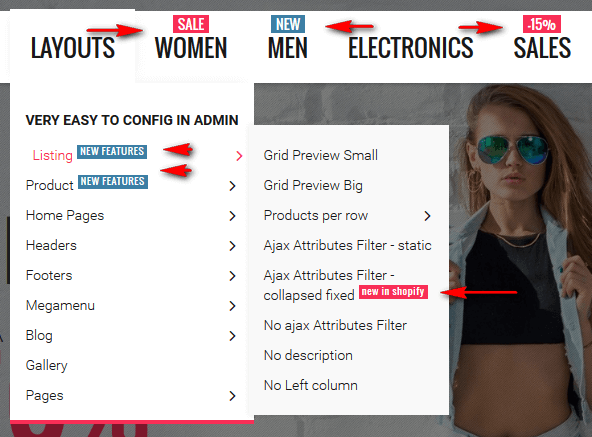
Goto Shopify admin -> Online Stores -> Themes -> Customize Theme -> Megamenu -> Labels for navigation items


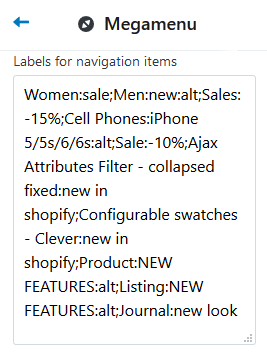
As You can see all Labels were filled in one place. We decided that this method is more easy way to keep them.
Important rule separate them with ";"
First part is Navigation item Title:Second part Title of the Label:Third is optional (if You want blue color write alt)
For example, I want red label with discount -50% on Navigation Item 'Sale' - write "Sale:-50%"
For example, I want blue label with discount -50% on Navigation Item 'Sale' - write "Sale:-50%:alt"
Seiko theme has two product view designs Classic (by default) and Creative.


Creative design works only if product has 3 or more images, otherwise will be enabled Classic design automatically.
Q:How enable Creative design?
A:1.Goto Shopify admin -> Products -> Products

2.Choose any product and Click. After you will see next field called Template in product admin page
3.Select product.creative and click Save

Goto Shopify admin -> Online Stores -> Themes -> Customize Theme -> Product page


Available options for product are:
//copy lines from here if you want revert code in texarea
For example, you want create tab Sizing Guide:
//copy html from here
Single Size Conversion
UK
-
18
-
20
-
22
-
24
-
26
European
-
46
-
48
-
50
-
52
-
54
US
-
14
-
16
-
18
-
20
-
22
Australia
-
8
-
10
-
12
-
14
-
16
You can create your own tab title with content as described for Product tab 2 above


1.Goto Shopify admin -> Products -> Products

2.Choose any product and Click
3.Add shortcode to content area [countdown]2017/12/31[/countdown] Important! If you use one or more shortcodes you must once write next shortcode |[config]| (this shortcode separates default product descriptiom from seiko theme shortcodes)
Full version [countdown]2017/12/31[/countdown]|[config]|

If more than one shortcode [countdown]2017/12/31[/countdown][video]http://www.youtube.com/watch?v=qZeeMm35LXo[/video]|[config]| ([config]| was written once)
4.Add Compare Price

Important! If Compare Price empty Countdown will not be shown, because in files:
I've added condition
{% if on_sale %} // this condition
{% endif %} // this condition
You can remove condition if you want set countdown without Compare at price
5.Optional - We advice you set for sale products tag sale for better work collection tags filter


1.Goto Shopify admin -> Products -> Products

2.Choose any product and Click
3.Set product tag new

4.Click Save
1.Goto Shopify admin -> Products -> Products
2.Choose any product and Click
3.Add Compare Price

4.Click Save


1.Goto Shopify admin -> Products -> Products

2.Choose any product and Click
3.Add shortcode to content area [video]http://www.youtube.com/watch?v=qZeeMm35LXo[/video] Important! If you use one or more shortcodes you must once write next shortcode |[config]| (this shortcode separates default product descriptiom from seiko theme shortcodes)
Full version [video]http://www.youtube.com/watch?v=qZeeMm35LXo[/video]|[config]|

If more than one shortcode [countdown]2017/12/31[/countdown][video]http://www.youtube.com/watch?v=qZeeMm35LXo[/video]|[config]| ([config]| was written once)
4.Click Save


1.Goto Shopify admin -> Products -> Products

2.Choose any product and Click
3.Add shortcode to content area [short_description]Neque porro quisquam est, qui dolorem ipsum quia dolor sit amet, consectetur, adipisci velit, sed quia nonkdni numquam eius modi tempora incidunt ut labore [/short_description] Important! If you use one or more shortcodes you must once write next shortcode |[config]| (this shortcode separates default product descriptiom from seiko theme shortcodes)
Full version [short_description]Neque porro quisquam est, qui dolorem ipsum quia dolor sit amet, consectetur, adipisci velit, sed quia nonkdni numquam eius modi tempora incidunt ut labore [/short_description]|[config]|

If more than one shortcode [countdown]2017/12/31[/countdown][short_description]Neque porro quisquam est, qui dolorem ipsum quia dolor sit amet, consectetur, adipisci velit, sed quia nonkdni numquam eius modi tempora incidunt ut labore [/short_description]|[config]| ([config]| was written once)
4.Click Save
Product can be colorized only if it is has color option.


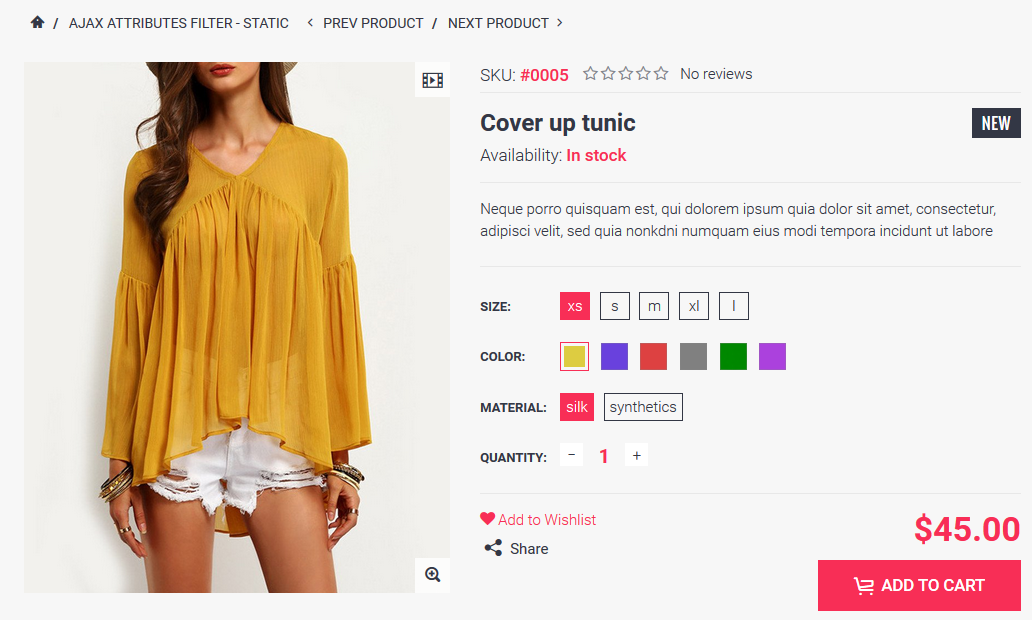
1.Goto Shopify admin -> Products -> Products

2.Choose any product and Click
3.Add product variants

3.Change Size to Color or click Add another option (Color)

4.After saving option values appears ability add images for options

5.Finish step. Add color pics for configurable swatches (product and collection page)
Important! Save image name only in downcase format 'color-yourcolorname.png' (instead spaces in yourcolorname use symbol '-')
For example You have color name in admin product option 'Dark Black', then upload color-dark-black.png
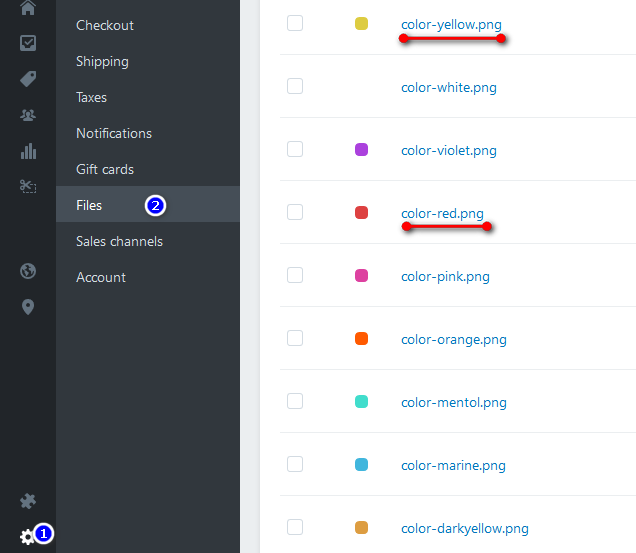
Important! Prefix color- is required! And only PNG format for color pics.
Goto Shopify admin -> Online Stores -> Themes -> Customize Theme -> Collection page


Available options for collection page are:
This option enables/disables this description.

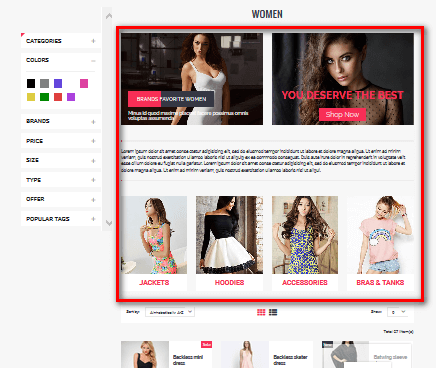
There no need to know html code create such description, because we created Online Banners Editor. See video guide how we created html code for description.
Generated description code like in demo
//You can copy ready generated html here
Lorem ipsum dolor sit amet conse ctetur adipisicing elit, sed do eiusmod tempor incididunt ut labore et dolore magna aliqua. Ut enim ad minim veniam, quis nostrud exercitation ullamco laboris nisi ut aliquip ex ea commodo consequat. Duis aute irure dolor in reprehenderit in voluptate velit esse cillum dolore eu fugiat nulla pariatur. Lorem ipsum dolor sit amet conse ctetur adipisicing elit, sed do eiusmod tempor incididunt ut labore et dolore magna aliqua. Ut enim ad minim veniam, quis nostrud exercitation ullamco laboris nisi ut aliqui.
We advice create ONE navigation handle for this.


If checked - filter fixed and collapsed as accordion
If unchecked - filter static and groups are opened
In contrast to our top competitors on TF, we completely redesigned filter.
Early often was principle when you had ~ 5 filter groups of tags hardcoded to the theme : Price, Brands, Popular Tags, Sizes
And the bigest problem was that these filter groups were are same for all categories (Women, Men, Electronics
Now every category has own set Of filter groups.

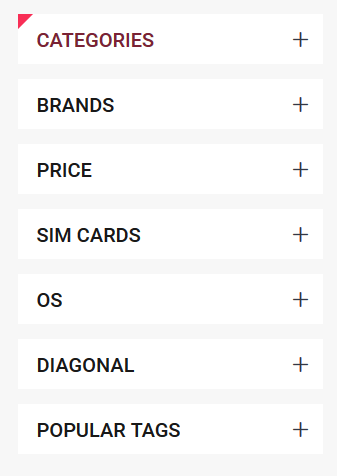
Sidebar filter based on tags. Tags must be assigned for products by your own criterias.

Product has tags:Sim 1, electronics, Andriod, Acer, Above 200, 4
If you click some tag in sidebar filter module searchs all products with clicked tag.
Q:How Sidebar filter collects and distributes all tags from all products by logic groups.
A:You have to do it yourself:
Goto Shopify admin -> Online Stores -> Themes -> Customize Theme -> Collection page


There filter groups:

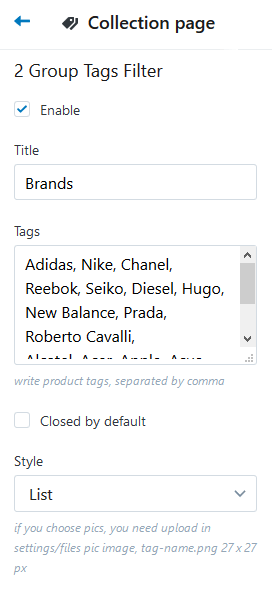


1 Group Tags Filter It is Group that collects associated within the meaning of the tags
Available options for filter group:




if you use Pics style you have to upload pics here Shopify admin -> Settings -> Files -> Upload Files
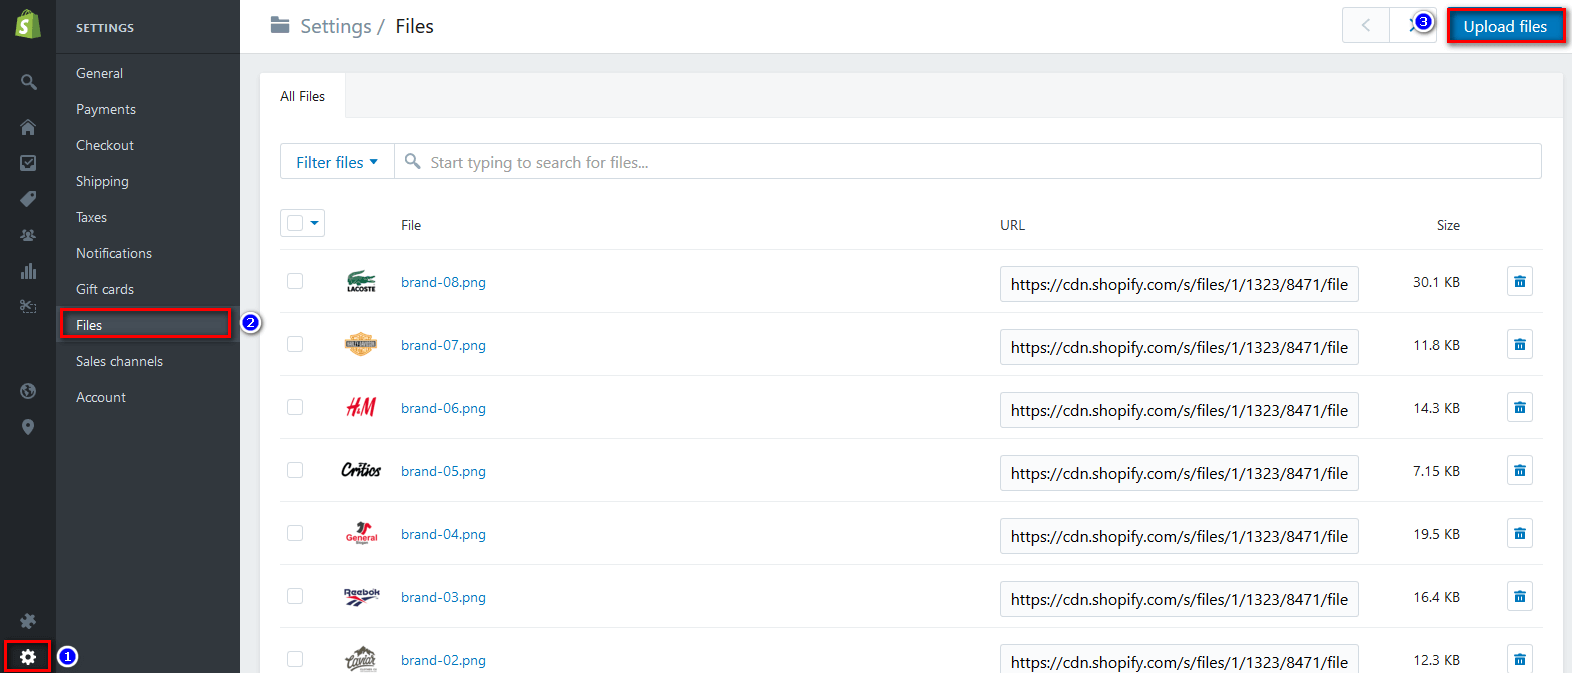
Upload special format of file name color-{{tagname}}.png
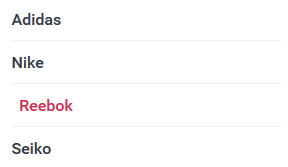
For example, You Filled tags in group: Black, yellow, Dark-blue. You need upload files color-black.png, color-dark-blue.png, color-yellow.png with 25x25 px size
Sidebar filter has 10 different groups. Count of groups can be extended in code.
This material is taken from official sources https://help.shopify.com/manual/sell-online/online-store/blogs

Your Shopify store comes with a built-in blogging engine. Blogs are great for content that you’ll be updating regularly. They’re also best if you want to encourage feedback on an article, because people can post comments on your blog posts. Choose to post on your store’s blog if you’re looking to create discussion and build a community around your products and your brand.

Admin panel allows you upload main slide image.
In admin exists separated textarea Text Animation, where you can add animated captions
We use popular swiper slider.
Animation rules / data-parameters and demo slides examples showed in Sliders animated items
Example code for video
This material is taken from official sources https://help.shopify.com/manual/sell-online/online-store/blogs/getting-started-blogs
Create a new blog with a custom name for all your blog posts.
To add a new blog:
Click Manage blogs:

Click Add a blog:
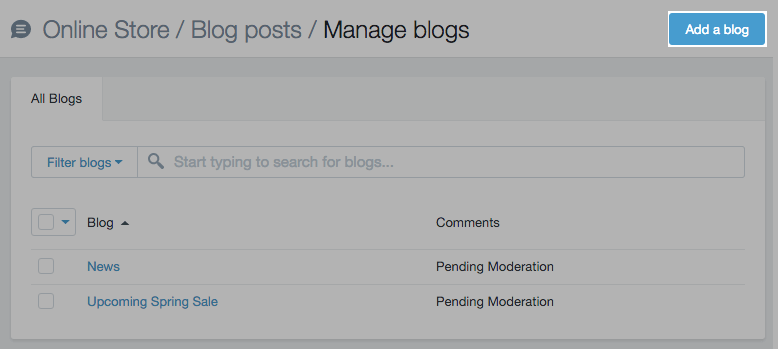

Click Save blog.
Now that you have created your blog, you can add your blog to your main navigation menu.
This material is taken from official sources https://help.shopify.com/manual/sell-online/online-store/blogs/writing-blogs
To add a post to your blog:
Click Add blog post:

On the Add blog post page, fill out the following fields:

You must complete at least the title field to successfully create a blog post.
In the Organization section, you can add tags to your blog posts to help categorize them and make them more visible for better search engine optimization (SEO):

If you want an image to appear next to your post on your store's Blogs page, click Choose image in the Featured image section:

Seiko Blog has 4 layouts:


Goto Shopify admin -> Online Stores -> Themes -> Customize Theme -> Blog


Available options for collection page are:
1.Login to Your shopify store. Go to Online Stores -> Pages.

Next

2.Click Add page

3.Choose template page.gallery, write Page Title Gallery and click save
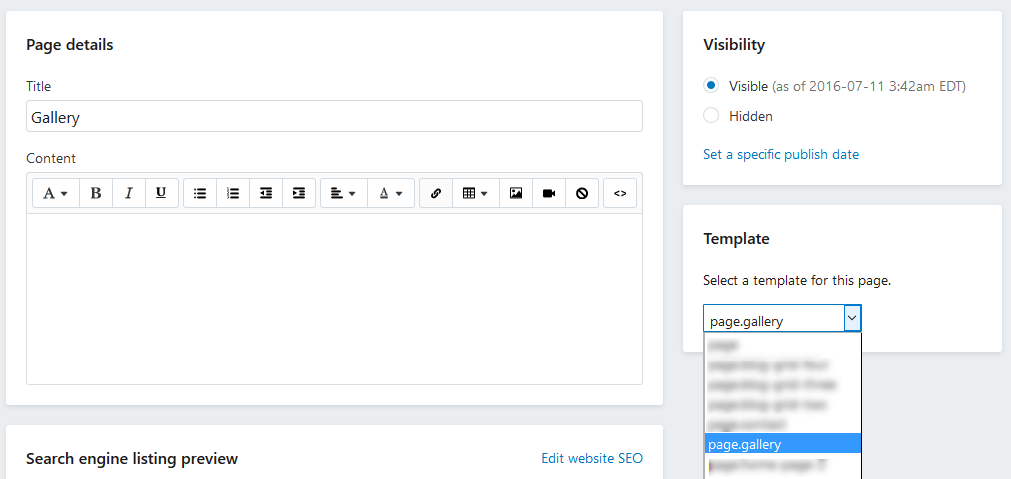
Click Save
Now that you have created your Gallery page, you can add your Gallery to your main navigation menu.
Available options for Gallery page are:
Title - type textarea.
Example title
                            //copy title from here
                            //demo title 1
                            Evening Dress 2016
                            //demo title 2
                            Beauty is everywhere
                            //demo title 3
                            Jeans rule the world
                            //demo title 4
                            Amazing Elegance
                            //demo title 5
                            Refined lines
                            //demo title 6
                            The colors decide
description - type textarea.
Example description
                             //copy description from here

                                Nam libero tempore, cum soluta nobis est eligendi optio cumque
                                Nompedit quo minus id quod maxime
There are you can add 20 gallery images. Increase count of images you can only by extending code

We pasted instagram widget in blog in file snippets\blog-sidebar.liquid
{% include 'instagram-widget' %}
You can move and paste this widget in any other place of the site.
Required condition that you can show photos only from your account.
You have to generate accessToken (how get accessToken read here https://www.instagram.com/developer/authentication/ Client-Side (Implicit) Authentication)
Goto Shopify admin -> Online Stores -> Themes -> Customize Theme -> Instagram


Available options for Instagram are:
1.Login to Your shopify store. Go to Online Stores -> Pages.

Next

2.Click Add page

3.Click Show Html and paste code from theme-package/documentation/demo_pages/about_us.txt

Click Save
Now that you have created your About Us page, you can add your About Us page to your main navigation menu.
This page can be created fully as described in Create About Us page
Seiko Theme uses simply and flexible icon library IcoMoon.
IcoMoon is striving to build and provide the best iconography and icon management tool for perfectionists.
If you want to add new icon to library follow instruction, provided below:
1. Go to IcoMoon - Free -> Click Import Icons -> Upload there is our SeikoIconsMap:
All Seiko icons will be imported!
2. Then select new icon(s)
3. Generate your custom font
4. Download new Icons Set, unzip archive and replace all font files (icomoon-reg.eot, icomoon-reg.svg, icomoon-reg.ttf, icomoon-reg.woff) in 'customize theme/assets/' folder of Seiko Theme
5.Copy content of corner file style.css in new generated font folder -> remove all content in file 'customize theme/assets/font-icomoon.css' -> paste new content here. In new content remove all words 'fonts/' and save font-icomoon.css
6. Find new icon in demo.html and use it in your html code
For example like this:
1 2 3 | <i class="icon icon-drink"></i><i class="icon icon-coffee"></i><i class="icon icon-mug"></i> |
In Seiko theme You do not need to know html and css to create advanced banners and bootstrap grids.
We take care of your comfort and created online banners / grid editor.
You can use it http://seiko-shopify.big-skins.com/banners-grid-online-editor
But before We avice you see video tutorial how use it:
Seiko Theme has many settings in admin panel, most of them are Global, but you can set any page Individual settings
For example, you want set global settings in Collections list - Products per row 4, but for special collection you want set Products per row 2
1.Goto Shopify admin -> Products -> Collections
2.Choose collection you want show Products per row 2
3.In the begining of content area write products-per-row-2|[config]|

Important! |[config]| must be written once only at the beginning
Full list of special individual settings
| Page | Option | Description |
|---|---|---|
| Collection | products-per-row-2 | Shows 2 products per page on collection page |
| Collection | products-per-row-3 | Shows 3 products per page in collection page |
| Collection | products-per-row-4 | Shows 4 products per page in collection page |
| Collection | products-per-row-5 | Shows 5 products per page in collection page |
| Collection | grid-products-view-small | Shows small product's previews in collection page |
| Collection | grid-products-view-big | Shows big product's previews in collection page |
| Collection | collection-filter-ajax-1 | Enable ajax for Sidebar filter in collection page |
| Collection | collection-filter-ajax-0 | Disable ajax for Sidebar filter in collection page |
| Collection | collection-filter-fixed-1 | Enable fixed collapsed Sidebar filter in collection page |
| Collection | collection-filter-fixed-0 | Disable fixed collapsed Sidebar filter in collection page. Enable static mode |
| Collection | collection-left-sidebar-1 | Enable left sidebar |
| Collection | collection-left-sidebar-0 | Disable left sidebar |
| Product | product-image-size-small | Set Small image on product Page |
| Product | product-image-size-medium | Set Medium image on product Page |
| Product | product-image-size-medium-x | Set Medium+ image on product Page |
| Product | product-image-size-big | Set Large image on product Page |
| Product | product-options-select | Set classic form elements on product page (instead of configurable swatches) |
| Product | product-options-swatches | Set form elements like configurable swatches on product page (instead of classic form elements) |
| Page | special-header-default | Set header default on cms page |
| Page | special-header-2 | Set header-2 default on cms page |
| Page | special-header-3 | Set header-3 default on cms page |
| Page | special-header-4 | Set header-4 default on cms page |
| Page | special-header-5 | Set header-5 default on cms page |
| Page | special-header-6 | Set header-6 default on cms page |
It is useful data if you destroyed some code or cannot recreate your own
We tried use less html codes. It is used only in some places where specific html content.
Code of SVG Logo (Seiko demo logo):
Short Address:
Adress: 8901 Marmora Road, 64 GR, New York
Shipping links:
Original brandsFree shippingOriginal product
Support time (for header 5):
Mon-Fri: 8:30am-7:30pm; Sat-Sun: 9:30am-4:30pm
5.Social links (for header 6):
Top links (for header 6):
Your Seico.comGift Cards & RegistrySellHelp
Social icons:
1st column:
INFORMATION
2nd column:
MY ACCOUNT
3rd column:
CUSTOMER CARE
4th column:
CONTACT US
- +01 234 567 89
- support@seiko.com
- 8:00 - 19:00, Monday - Saturday
Address 1 :
ADDRESS 1
Address 2 :
ADDRESS 2
Google map code :
Slide 1 - Text Animation:
Seikō Season sale popular brands 70% OFF
Slide 2 - Text Animation:
Street Fashion And Urban Subcultures SHOP NOW
Slide 3 - Text Animation:
Slide 4 - Text Animation:
Summervery soonThings to buy a swimsuit at a discountSHOP NOW
Contacts:
Advantages Title:
Top Brands :
Brands html:
Goto Link here